CLICK HERE FOR FREE BLOGGER TEMPLATES, LINK BUTTONS AND MORE! »

Thursday, September 29, 2011

Stretchy Lace Cuff Bracelet

I always have a list of projects that I am going to get to...you know when you are surfing the internet and you find something you have to have--you file it away and hope that someday I'll get to it.  I had one of those a couple weeks ago...My husband was busy doing something on a Friday night and I was trying to find something to do after the kiddos had gone to bed,  and it hit me--BOOOYAAAAAA!  I'm going to make those Lace Cuffs to go with my outfit!  

I had found this cute tutorial on U-Create forever ago--it's actually from a gal on the 'I heart Naptime' blog.  Obviously, this was a late night kind of craft....which no preparation had gone into, so I made do and used what I had!  Here is what I came up with:) Remember this was late at night--the pics aren't fabulous:(  But the Lace Cuffs ARE!

All you  need is some stretchy lace, satiny fabric, some embellishments, and a glue gun!
To see the awesome tutorial yourself, go here.  Hope you find yourself looking for something to do soon:)  These are super comfy and I love it when I can MAKE something to match one of my outfits:) 

Tuesday, September 27, 2011

Project Life

Have you heard of Becky Higgins Project Life? It is a quick and easy way to document everyday moments. When I got this kit I got the binder, page protectors, journaling cards and stickers all for about $40! That's a steal!!! 


These scrapbook kits are a great way to document everyday moments. There are so many different ways to do them. You can simply use the page protectors and journaling cards to document your photos, you can take a picture a day and document your year, or you can use these pages to highlight a trip or month. 

I chose to take a picture everyday and completed Project life for 2010. It's a lot of work to take a picture everyday and I often had to take make up pictures. However, I love the results!!!!!! As I look back through this amazing scrapbook I am able to see a journal of our lives. Pictures and journaling everyday!!!! I captured so many little moments I would never have taken a picture of before. Even though this was a little bit of work, it was so much simpler then regular scrapbooking. I was able to complete this while working full-time and taking care of 2 little girls!!!


This is a sample of some of the journaling cards included. 


Check out the new collections debuting this October and November. I can't wait to get one to work on next year!!!


This year you can buy the kit or buy items separately. Happy Scrapbooking!!!

Friday, September 23, 2011

Ruffled Headband Tutorial

My sister-in-law sent me this awesome ruffled headband one year for my birthday. I have two sister-in-laws who are super crafty and have a fun blog Elle Michelle and Eliza Belle. I loved this ruffled headband so much I had to make a few more and came up with this fun tutorial. 

Supplies:
Ribbon
 (the same kind in 2 different sizes, I used 1 1/2 and 7/8
or 
you can buy some ribbon that's already ruffled, this saves you some time)
iron
sewing machine
matching thread
headbands
felt
hot glue gun
Fray Check


Step #1. Ruffle the ribbon. I slowly ruffle the ribbon and iron the heck out of it as you go. Some people like to pin it, but that never seemed to work for me. If you iron it well enough it's easy to put the ruffles back in place as you sew it. Repeat with the smaller sized ribbon also.


Step #2. Sew the Ruffled Ribbon. Use matching thread and sew a simple straight stitch down the center of the ribbon. Like I mentioned before, I don't mind if the ruffle comes undone. I simply ruffle it as I feed it through the machine. Repeat with the smaller sized ribbon also, so both sizes of ribbon are ruffled and sewn.


Step #3. Glue Ribbon to Headband. You'll only need enough ribbon to cover half the headband, which will give it a fun vintage look. Cut the ribbon to the size you want and glue it to the headband. Make sure to glue the larger ribbon on the bottom and the smaller ribbon on top.


Next, glue a piece of felt to the back. This will cover any hot glue mess and will also help hold the ribbon onto the headband.

Next, you'll glue the smaller ribbon right on top of the larger ribbon.

Once you have both ribbons glued on, add a little Fray Check to the raw edges of the ribbon to prevent fraying. (As you can see in this picture, I like to cut the one end that will go by your ear on a slight diagonal, the other end I just cut straight.)

And, just like that, you're done!!!


Tuesday, September 20, 2011

Craft Fair

Holla!  Last weekend Juliana and I participated in the Douglas County High school Craft Fair!  It was a great opportunity and we seriously had SO MUCH FUN!  
Check us out!
 Here's the spread--we never think we have enough stuff but then once we get it all out, we never have enough room!
Here are some close  ups of what we were selling--try not to drool:) 


It was a definite learning experience for us, but overall successful.  We can't wait for our parties that are already planned for the Holidays!  Remember to email us if you're interested in us throwing a party with you!  Just think--all this could  be at your house!  :)

Monday, September 19, 2011

She Can Art


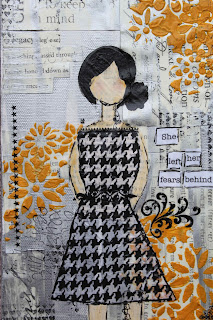
She Left Her Fears Behind


I have fallen in love with yellow this year and knew I wanted to make a girl with the colors black, white and yellow. I love how she is clean, simple and elegant. She has subtle strengthen and courage about her as she looks ahead. 


I used this really fun textured paint to give the canvas some depth. I love how the yellow flowers have texture and are raised off the page.


Here you can see my other favorite part of this painting. I had some old quote stickers in my scrapbook stash that I'd had forever. So to create a background I stuck them randomly on the page then used a piece of card stock (or you can use a credit card) to smear some silver paint over the top. I love the shine of the silver paint and I love how you can still see the words underneath. 


I gave her some classy boots and stamped all over the canvas with a heart stamp. I love this canvas. It has so much depth and yet is simple and elegant. 

She had the Courage to Dream


This girl is a dreamer. I like the purple, blue and brown colors together and I like the bird houses in the background. This painting has a grounded airiness. Her feet are firmly planted on the ground, but her eyes see endless potential. 

She had so much Potential


I love the fall colors and textures in this amazing canvas. The background is book paper and burlap covered with brown spray and orange paint. She seems a little sporty to me. A girl who likes being outdoors and doesn't mind getting her hands dirty. Her outfit is simple and pretty. With it being back to school season, I have a lot of friends who are off at college. This canvas reminds me of fall and school and all the potential in these talented kids. 


There is some burlap on the right covered in paint.


I love putting quote cards into the background. "Do Your Best" seemed so fitting for this canvas.


This canvas is very balanced with all the colors working in such harmony together. She had so much potential.

She had Hope


This canvas features a grey and blue background with some pops of color. I wanted the girl in this canvas to really stand out. I wanted her brightness and hope to be the center of attention. I used a lot of fabric and lace making this beautiful inspiring canvas. 


Here at the top you can see the lace, fabric flowers, and pleated ribbon. 


She Walked in the Light


I designed this beautiful canvas for my little sister's birthday. I love how the sunshine is such a central part of the picture. I wanted it to reflect the good choices she is making. I love the carefree feeling that comes from the butterflies and flowers. I wanted this girl to look trendy and casual. I tried to replicate a layered ruffle shirt with some cute skinny jeans. I love this canvas! Happy Birthday Sis!


All of these canvas are for sale. Send us an email if you are interested in purchasing one or would like me to paint a custom one for you.

 Happy Painting!!!!

Monday, September 12, 2011

Halloween Bows!!!!

I am so excited for the fall. I love back to school season. I love when the air starts to get crisp and I can wear sweaters. I love seeing the leaves change colors and I love love love the holidays!!!! I am really excited for Halloween this year. I made a whole bunch of fun bows and can't wait to celebrate this fun season!!!


Pumpkins and Spider Webs


Happy Halloween!!!


Orange Spider Web Bows


Purple Polka Dot Halloween Bow


Spooky Dots


Happy Pumpkins


Yummy Candy Corn!


Purple Spider Webs and Dots


Black and White Stripe


Halloween Classic


These gorgeous bows will be at the craft fair!!! Come and pick yours up to celebrate the Halloween season!!!